Website Hosting on Amazon S3 with Jekyll CMS
March 18 2013I finally decided to get a real domain and host this website on Amazon S3. I was the Product Manager for a few of the Amazon S3 website features that were released last year (see here and here). I always felt bad that I wasn’t hosting my blog on S3. Now that I’ve investigated Jekyll, a Ruby-based static site generator, I’m happy to report that this site (xingdig.com) is completely hosted on Amazon S3.

First, some background. Amazon S3 can host websites that are completely static. This means no server-side scripting (i.e. no PHP). I’m fine with this as long as there is an easy way for me to generate static html and upload to S3.
The benefits to using S3 are twofold: you get S3’s amazing availability and cheap pricing. S3 is designed for 99.99% availability and has an SLA of 99.9% availability. This means that in a given year, you would expect your website to be down for less than one hour. S3 pricing is really cheap as well since there’s no need to pay for a dedicated web server for the website; S3 is the web server. I’m only charged for storage (my entire site right now is 6 MB, so this is basically nothing), data bandwidth and requests. Requests and bandwidth have the potential to increase if this site gets popular, but that’s a good problem to have. I’m also paying $0.50 per month for an Amazon Route 53 hosted zone. In all, including the $9.99 for the Go Daddy domain, I’m expecting to pay around $16-$20 per year for this site.
Most personal websites nowadays need some type of CMS to allow end users to easily write posts and update content without re-architecting the whole site. With Jekyll, you can do this using a command line tool. Jekyll takes as input a collection of config files and page layouts in order to generate static html. Once I had the structure of my site set up, each incremental blog post is simply writing some content in a markdown file, re-generating the site (basically, a Jekyll compile), and uploading onto S3.
I’ll go into more detail on the steps I took to make this happen.
Step 1: Go Daddy Domain Registration
I decided to go with Go Daddy because it was the cheapest. I was able to register “xingdig.com” for $9.99 a year.
Step 2: Set up Amazon S3 for Website Hosting
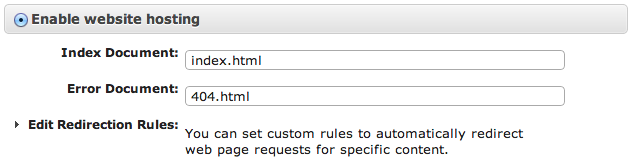
I already had an Amazon Web Services (AWS) account. If you don’t, you can create one here. In the Amazon S3 console, I created two buckets, “xingdig.com” and “www.xingdig.com”. I’m hosting this site out of “xingdig.com”, so all of my website content eventually ended up in that bucket. I created both buckets in the Oregon region - make sure you create both buckets in the same region. In the properties area for “xingdig.com”, I chose the option to “Enable website hosting” and specified index.html and 404.html for index and error documents. The index document simply tell S3 what file to look for if someone requests a web page that is a folder. For example, if you request “xingdig.com/about/”, S3 is actually looking for “xingdig.com/about/index.html”. The error document is the page that should be shown for any 404 errors. Take note of the
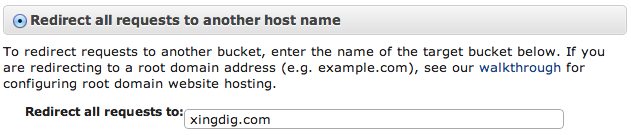
I set up “www.xingdig.com” bucket in case anyone tries to request “www.xingdig.com”. By setting up a redirect on that bucket, I’m ensuring that anyone that accidentally adds “www.” to the URL in visiting my site still gets properly redirected. For example, if you request “www.xingdig.com/about/”, S3 will automatically redirect you to “xingdig.com/about/”. I configured the redirect through the same properties area for bucket “www.xingdig.com”. Take note of the website endpoint here - for me, it’s “www.xingdig.com.s3-website-us-west-2.amazonaws.com”.
Step 3: Set up Amazon Route 53 for DNS
I’m using Amazon Route 53 because it’s the only way to host a website at the root domain or naked domain (i.e. without the “www”). If you’re ok with hosting your site at “www.yoursite.com”, then you should be ok with using your own DNS provider.
In the Amazon Route 53 console, I created the hosted zone “xingdig.com”. You only need to create a hosted zone for the top-level domain name.
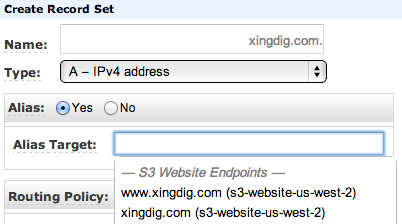
First, I will set up the hosted zone so that it directs requests for my S3 buckets to my true domain. By default, S3 serves web requests using the endpoint we noted earlier. This isn’t great if I want people to access my site using my friendlier, shorter domain. I do this by setting two alias records.
I created a record set of type “A - IPv4 address” and selected “Yes” for Alias. For the Alias target, I’m able to select the S3 Website Endpoint for my bucket, “xingdig.com”.
Next, I created another record set of type “A - IPv4 address” and selected “Yes” for Alias. This time, for the name, I’m using “www.xingdig.com”. Everything else is the same - I select an Alias Target that corresponds to my “xingdig.com” bucket.
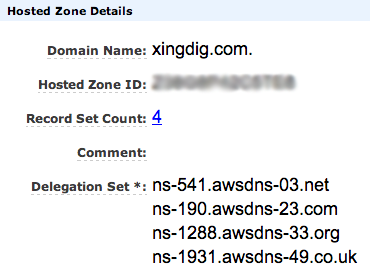
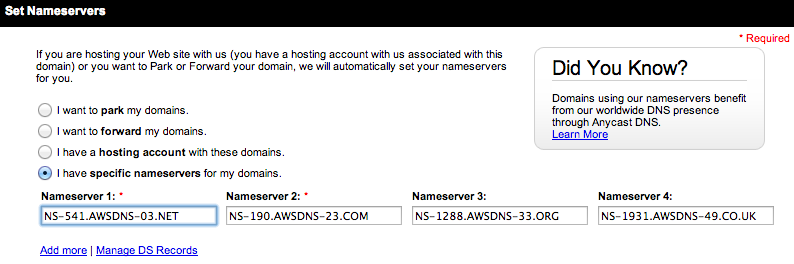
Finally, I needed to make Route 53 the DNS provider for “xingdig.com”. Because I signed up my domain with Go Daddy, they serve as the DNS by default. I need to configure Go Daddy so that requests for “xingdig.com” will be served using Route 53 as DNS. When I created the hosted zone “xingdig.com”, Route 53 shows me four NS (or Name Server) records.
Step 4: Go Back to Go Daddy to Configure NS Records
This is a quick step, but I simply needed to go back to Go Daddy and add the four NS records from the Route 53 hosted zone. In Go Daddy, there is a config for the domain, so I just had to add the four NS records to that section. Unfortunately, NS records can take some time to propagate through. For me, it took a few hours before Go Daddy started using Route 53 name servers.
Step 5: Install Jekyll
I encourage you to see Brandon Bohling’s excellent guide for installing Jekyll on Mac. The only thing I would add is that you need to install XCode Command Line Tools as well. To do this, go to XCode -> Preferences -> Downloads, and choose to install Command Line Tools.
For the Jekyll setup itself, I looked at other websites that are hosted using Jekyll. My site is borrowing heavily from Michael Lancaster’s site. I’m also using jekyll tagging to automatically categorize each blog post by topic area.
I might go into more detail about my Jekyll setup in a later post.
Step 6: Enjoy the Results!
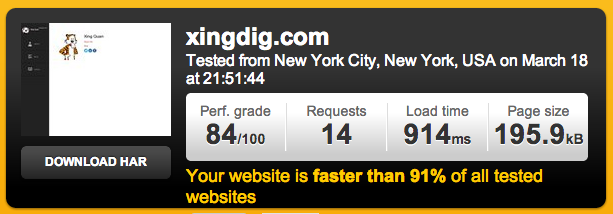
I decided to test the speed of my website. According to pingdom, xingdig.com is faster than 91% of all tested websites!
comments powered by Disqus